
Recently I wrote the YA version of one of Jared Diamond’s books. It was the first long project I’d begun in Scrivener. I’d imported a couple of WIPs into Scrivener, but starting a manuscript from the ground up in the program gave me new insights into its usefulness.
I also made a Scrivener mistake I’ll never make again.
Today I’m passing on three tips–which are really appreciations of Scrivener features I found especially handy–and a warning against that dumb mistake.
First, some context. Writers of all kinds use Scrivener, but most articles I’ve seen are aimed at novelists. I too use Scrivener to write fiction, but my paying gig is writing nonfiction books, mostly YA. In addition to my own books for various publishers, I’ve adapted a handful of science and history bestsellers into YA versions. (The best-known of these is probably The Young People’s History of the United States, an adaptation of Howard Zinn’s monumental progressive history.)
For years I’ve worked in Word (since 2007, in OpenOffice’s clone of Word). I’m expected to turn my mss. in to my publishers as .doc files. Scrivener makes it very easy to export into a .doc file. I doubt I’ll ever again embark on a nonfiction project–or any writing project longer than a couple of pages–in anything but Scrivener.
If you’re reading this, you probably already know something about Scrivener. If you don’t, go on over to the developer’s website, www.literatureandlatte.com, and check out this feature-rich, flexible writing software for Windows and Mac. I’m not trying to introduce you to Scrivener or describe it in detail, just to share a few things I’ve learned.
They are:
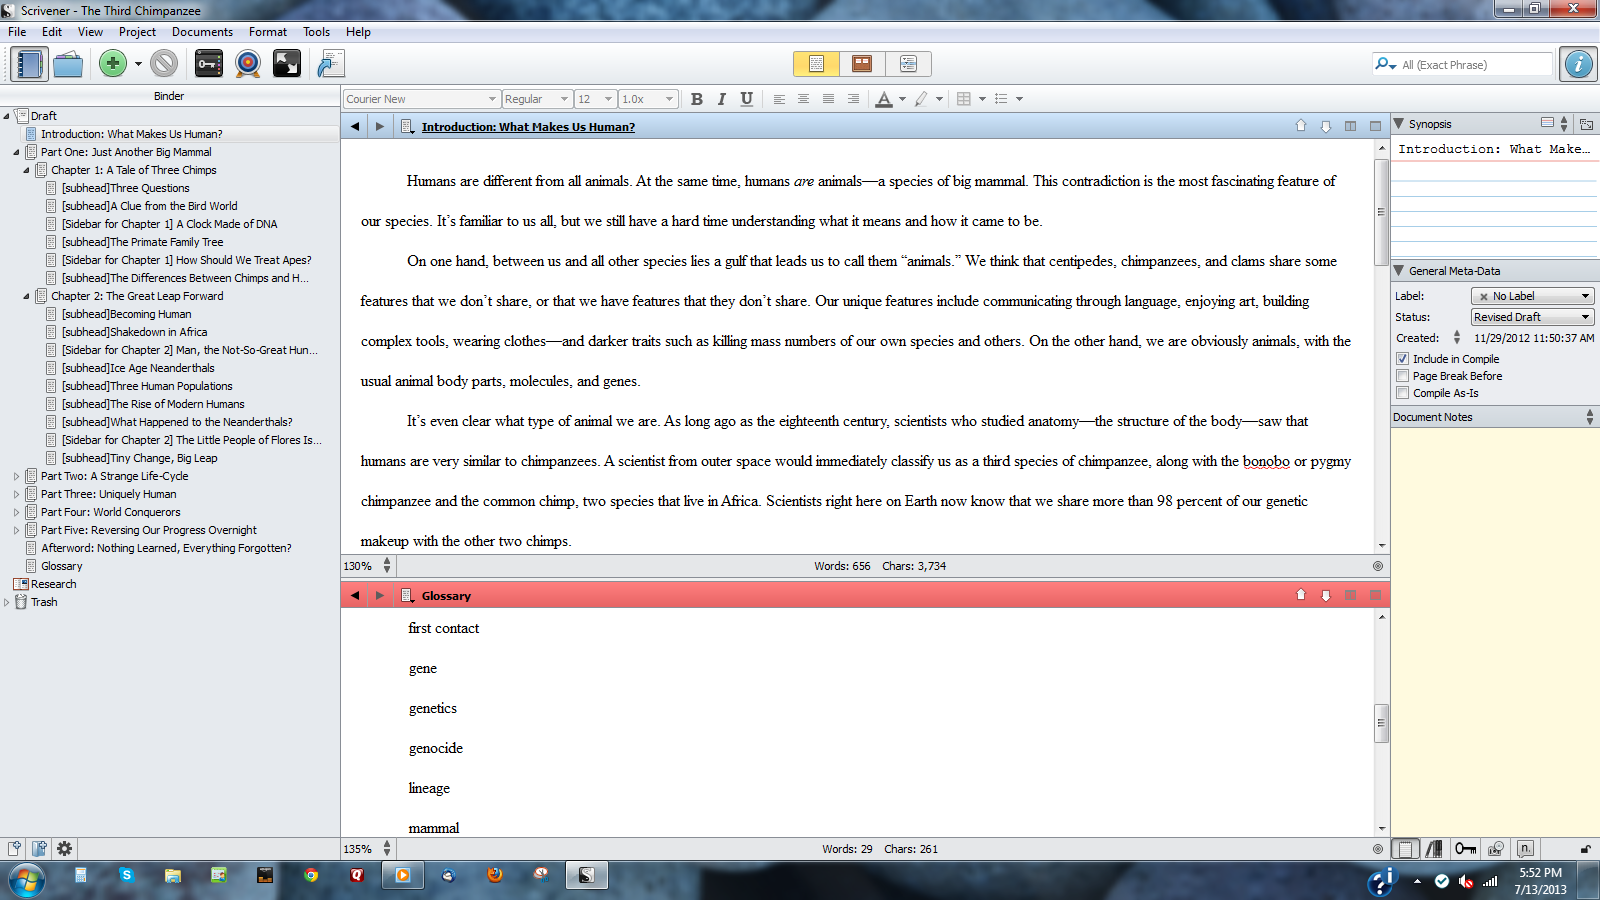
1. Embrace the binder.
The binder is the vertical panel at the left of the Scrivener workspace. It contains a folder for each part of the project, organized into files as needed. This was, in essence, the outline I showed to the publisher and Professor Diamond before I started the writing. (Click on the image to embiggen.)
For the YA version of The Third Chimpanzee, I didn’t have to do research or create a structure. The parent text–Diamond’s book–was my source. Like the parent text, my manuscript would consist of an Introduction, five Parts (each with a one- or two-page opener, summing up what that Part would cover), and an Afterword. In the parent text, each Part had from two to five chapters. With a few exceptions, which I’ll mention in a moment, I followed that pattern.
But I did have to break the chapters down into sections and create many, many subheads–standard in YA nonfiction–for those sections. I also had to pull elements from the parent text out into sidebars. The outline I developed in Scrivener’s binder showed all of the subheads and sidebars for each chapter.
Those exceptions I mentioned? In a few places I diverged from the structure of the parent text. While still in the outline stage I combined three chapters on human sexuality into one. (Even one can raise the alarm for school-board Grundys.) Later, during the writing, I cut, rearranged, or combined a few sections. I even cut an entire chapter. The binder made it easy to enact these changes. Deleting is always easy, of course. Maybe too easy. Before every cut, I used Scrivener’s Snapshot feature to preserve the current version. As for combining and rearranging, just drag-and-drop the binder entry, and the corresponding text travels with it in the document. While working I usually collapsed all of the Parts folders except the one with the chapter I was writing.
2. Write out of order.
Sometimes I write a book straight through from the beginning to the end. Sometimes I write the first and last chapters, then fill in the middle. Sometimes I write all the sidebars first. No matter how I write, I have always preferred to work with one long (sometimes very long) .doc file instead of separate files for each chapter. Most of the time the back matter–glossary, timeline, biblio, etc.–is also in that same file, at the end. It’s what I’m used to. But it can mean a lot of scrolling ahead and back.
For the Third Chimp adaptation, my goal was to use as much of Professor Diamond’s original text as possible, cutting and simplifying and adding information to make it accessible to younger readers, rewriting only when necessary. As always when doing these adaptations, I want to preserve the author’s voice and tone.
To feel my way into The Third Chimp, I chose to begin by writing the Intro, the Afterword, and the five Part openings. With those in place, I felt I’d established a consistent tone. (And I always like knowing, as I work my way through the guts of a ms., that the last bit is already written.) I then wrote the chapters for Part One, Part Four, Part Five, Part Three, and Part Two in that order.
Never had it been so easy to write a long (50+K) manuscript nonconsecutively! No scrolling needed, just a click on the binder entry and boom, there I was. And I could see at a glance which chapters, sections, and sidebars remained to be done–Scrivener fills in the small file or folder icon in the binder entry when you’ve written some text for it.
3. Use the split screen.
One of my tasks was to build a glossary for the YA version of The Third Chimp. For me, the best way to do this is to compile a list of potential glossary terms as I work, then write the definitions after the ms. is complete. In Word, I occasionally I kept the glossary list in a separate file and flipped into it every time I wanted to add a term (or check to see if it was already listed). More often, though, the glossary was part of the back matter at the end of the long single file, and I had to scroll back and forth between it and what I’d been writing. Tedious.
With Scrivener’s split screen, as you can see, I opened my glossary list in the bottom window of the text editor. The top window held the section I was writing. This saved a lot of time and aggravation. I didn’t always keep the glossary open, but when I needed it, it was right there.
And now for that warning:
Avoid premature exportation.
You know how it is when you’re writing, especially a long text. You get restless, you start looking for things to do that aren’t writing but are kinda writing-related, so you can use them to justify not writing. Usually for me it’s “more research.” But except for a few minor updates, I didn’t have to research The Third Chimp; Professor Diamond had done that.
So one day, somewhere past the midpoint of writing the book, but not nearly close enough to the end, I got to thinking about that end. I would have to present a .doc file to the publisher and Professor Diamond for their review. Maybe I should give Scrivener’s Compile and Export features a test run?
Compile is a powerful command that can do many subtle things. But with no front or back matter involved, my Compile was pretty simple: just assemble all the text units, with page breaks at the end of each Part or Chapter. A couple of clicks later I had a .doc file in 12-pt. Times New Roman, double-spaced.
I should have stopped right there, curiosity satisfied, and deleted that file and gone back to Scrivener to finish my book.
But I noticed something wrong, something that had bugged me with each new section I wrote in Scrivener. I use a standard paragraph indent for every para EXCEPT the first para after any title: Part, Chapter, Section, Sidebar. Those first paras only have to be flush left. I could never figure out how to tell Scrivener that. It indented all my paragraphs.
Without thinking, I started idly scrolling through the newly created .doc file of my three-fifths complete manuscript, left-flushing all those first paragraphs. It took a while. Along the way I saw typos, infelicitous word choices, and clunky sentences, and fixed them. Why? Maybe I was lulled or seduced by the familiarity of the Word-clone interface–I’d written more than a hundred books in it.
At any rate, by the time I realized I’d been editing the unfinished ms. outside Scrivener, I decided, rightly or wrongly, that it was too late to move it all back in. I’d keep the changes I’d made and simply write the remaining two-fifths of the book in OpenOffice.
Reader, I wrote it. And it will soon be published by Triangle Square Books, an imprint of Seven Stories Press. But writing the last two-fifths was a lot less convenient than writing the first three-fifths.
Ditch Scrivener in mid-project? Learn from my mistake. Don’t do that.
I know this is an old post and with the rebirth of Scrivener (the new v3), this may be a moot point, but… I also flush my left margin and could not figure out how to do it within the compile box. I ended up letting it go until I was finished with Scrivener at the end of my “next to last” draft. At that time, I compiled everything I was able to do within Scrivener, exported to MS Word, and made those pesky little adjustments there.If there is a way to format that flush left within Scrivener, I have not been able to find it. But for everything else I use it for, Scrivener is the bee’s knees!
Thanks! And sorry for the late reply. For some reason I’m not getting notified these days when there are comments pending.
Sorry for the late reply, but thanks for this tip. It’s really a great way to get all kinds of documents instantly whipped into consistent shape.
A solution for your warning:
1. Go to Tools – Options – Editor and define your new “Default Main Text Attributes”.
2. In the Binder select all the documents that you want to reformat and width those documents selected go to Documents – Convert – Formatting to default text style, hit yes and you are done 🙂
I had exactly the same experience. The only thing I so in Word now is correct pesky things like the backwards single quote in contractions. Scrivener should probably direct newbies to your top three.
Pingback: What is Scrivener? | Writers in the Grove
Sorry to be so long responding to this, Peter! Thanks for the feedback. (I need to update my comment-notification widget.)
I bought Scrivener while in the middle of a life-enrichment seizure. (I woke up in a novel-writing night course.)
I never finished that novel but I started a whole bunch of them. So, better than nothing.
Now I use Scrivener for all of my web-authoring and curriculum-building tasks. It has adaptable features that casually lend themselves to “pages” or “slides” or whatnot.
I was happy to read your tips, Rebecca, and feel an urge to buy People’s History The Younger for my subversive nephew.
Thanks very much! This has been a perpetual headache. You’ve made me realize that I need to spend more time exploring the menu, sub-menu, and sub-sub-menu options. I appreciate the tip!
You can get the first line to be flush when you compile using the formatting options.
To do this hit compile, go to formatting (fourth option on the left). Under the top section of the formatting area there is a table of section options that will probably say ‘Override text and notes formatting’. To the left of this there is an options button. Click on that.
On the new panel you will find an option ‘Remove first paragraph indents’. Turn this on.
You can experiment with the three sub options to determine which option is best for the way you have setup your project.
Pingback: Wednesday Reblog | Leigh Michaels
More thanks to Robert Chazz Chute for the tip on First Paragraph Flush Left. I’m a new Scrivener user working on my first book, and spent the past half hour trying to find out how to do this and finding information that only worked on the Mac version. Now I can adjust my paragraphs and get back to writing.
That’s a problem I haven’t run into, Steven. The lines you mention only show up when I’m in Scrivenings mode (viewing a bunch of documents in sequence). When I’m working in a text document I don’t see them.
Good advice.
I’m trying to understand the dotted lines in blank Added Text pages / folders. Why are they there or not and can they be moved or deleted or are they only functions of folders/subsections?
So far I’m putting text into pages without them or below the line in folders because the text above one in a folder did not compile.
Excellent suggestion, Steven, thanks. I’m going to try that right now. I’m still tediously back-spacing the first paras of chapters and new sections within chapters. Your system sounds better.
I’m writing my first ever book, and found Scrivener because I searched for a Linux compatible authors writing aid (I’m actually using it on Xubuntu). I also wanted the first paragraph to be left aligned and all others indented – I ended up copying the Body format (after setting the font style, etc I wanted), moving the first line indent on the ruler and saving that as a new format called body indented.
I now apply the new format as the default and just set the first line to Body. Works perfectly, if a little fussy 🙂
Robert, thanks for the suggestion about those first paragraphs. I’ll try it with my next project.
And I agree, Scrivener is definitely worth it in the long run!
Thanks for this. I ran into trouble with Scrivener early on and the learning curve was steep because I didn’t find the interface intuitive. I think I must have run into the same problem you did editing an exported manuscript. However, Scrivener is worth it in the long run, despite those frustrations. (Now to help avoid version confusion, I label each new day’s writing with a date in the file label.)
Re: First Para Flush Left, try selecting the first paragraph in each chapter and under the “backwards P” tab, click the Body Text option. Et voila! No indent.
Thanks for this helpful post.
Pingback: No Wasted Ink Writer’s Links | No Wasted Ink
Payamarnuwa, thanks for the encouragement to keep tweaking Scrivener until it fully meets my needs. One of the virtues of the program is the high level of customizability. Another is that, as you say, once you’ve got something right in Scrivener, it’s right for good.
I’ve been careful to avoid tedious tasks that have to be done in Word before printing off a copy of my thesis for my supervisors. My list of jobs includes formatting an endnote bibliography, paginating tables and captions, footnotes, etc. so they all appear on the correct pages, changing lots of bits of my work into small caps (scrivener only ‘fakes’ small caps, yet I need them in my field), and replacing images of tables with natively Word-produced tables. This all takes an entire day, easily. So my supervisors now expect that my exports are going to be a little unpolished.
If I see some formatting issue in Word, I’ll go back and try to sort it out in Scrivener before exporting again, and again and again until i’ve fixed it. This can be tedious, but I’m safe knowing that when it’s fixed, I’ll never have to deal with it again. Fixing it in Word will mean I’ll have to fix it manually each time.
I love scrivener, and have managed to tweak it very finely to my proclivities and my writing style, but also my particular field and its requirements, and I also love that for any problem, there are often several different solutions.
Pingback: Three tips and a warning | Everything Scrivener
I feel you have performed an important public service here–thank you, R!